Thursday, December 29, 2011
Batch #1
Batch #1 has been in the secondary since Saturday so last night was time to check the specific gravity. When we initially opened the fermenter, we thought something was wrong because the surface appeared to be covered in mold. However, a closer look revealed that it was just some residual foam. Plus, the smell was amazing! The hydrometer measured the specific gravity at 1.020 and the alcohol content right at 5%. Our recipe calls for 1.010 to 1.015 so it probably isn't quite ready yet. We'll measure again in 48 hours - if it's the same, we're ready to bottle. If not, we measure again in 24 hours.


Wednesday, December 28, 2011
Brie Pockets
 |
| Brie pockets right before going in oven |
 | ||
| Finished brie pockets |
Last week, I stumbled across the above recipe while blog-surfing. I didn't manage to mark down the blog but the recipe totally stuck in my head. The post only included sweet brie pockets but, of course, Ty was having NONE of that. So we made two batches. Mine was sweet with brie and pear butter (see prior posts on canning - this was homemade!). And Ty's batch was savory with brie, salami and jalapenos.
They were delish!! Brie pockets will definitely be on regular rotation for apps in our house.
Monday, December 26, 2011
Brie Grilled Cheese
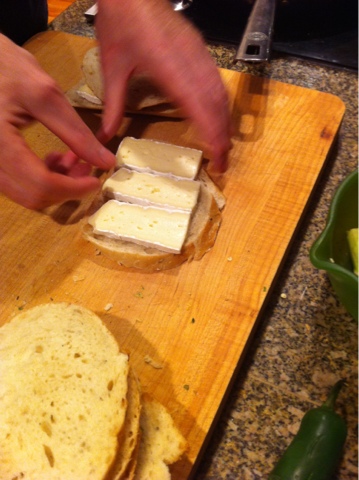
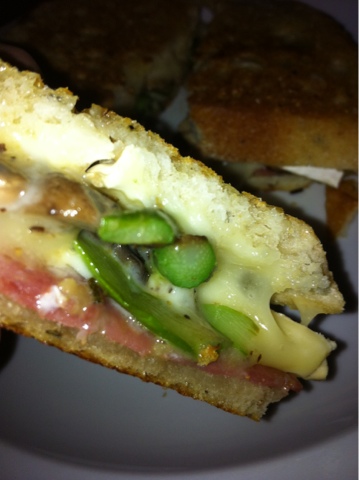
Grilled cheese sammies are a staple in our house. Who doesn't love a simple grilled cheese with cheddar and whole wheat or sourdough bread? Of course, that's even better if it's grilled in a pan with a bunch of garlic cloves and EVOO. But what can you make with leftover Brie and rosemary bread and the last of the salami, asparagus and mushrooms? I'd call that one gourmet grilled cheese!!


Beer Quotes
We have a friend who is going from a homebrewer to a legitimate brewer who recently posted the following quote on my facebook page:
"Give a man a brew, he'll waste an hour. Teach a man to brew, he'll waste a lifetime."A quick Google search attributed the quote to Bill Owen, whoever that is. It made me think of the beer quote posted at my favorite bar:
"Beer is proof that God loves us and wants us to be happy" ~Benjamin FranklinHere's another good one:
"I feel sorry for people who don't drink. When they wake up in the morning, that's as good as they are going to feel all day." ~Frank SinatraWhat's your favorite beer quote? If you have one, post it in the comments.
Saturday, December 24, 2011
Batch #2
 |
| Home made grain bag going into pot |
 |
| And coming out of pot... look at that yummy start to a batch of Ruby! |
 |
| Used grains cooling down before being added to the compost bin |
 |
| Hops getting ready to be tied up in the homemade hop bag and boiled for an hour |
Batch #1
We haven't been blogging much lately for a lot of very good reasons that you don't care about. We have found a new culinary related passion - homebrewing! We made our first batch last weekend and it was quite the adventure...
We decided to start with a stout because the ladies at the homebrew store said it was a good starting beer and because we really enjoy stouts. We bought a starter kit but, upon opening the box, were a bit disappointed that there was nothing to explain what each piece of equipment was nor were most of the items labeled. After getting the water up to the proper heat to put the grains in, we realized that we'd neglected to buy a grain bag. That was fine, though, thanks to my cheesemaking adventures. We improvised a 'grain bag' out of a 2 foot by 2 foot section of cheesecloth. First crisis, adverted!!
So, we steeped the grain for half an hour, added the malt and boiled for an hour. At the end of that, you're supposed to add a bag of ice to the fermenter before adding the hot liquid... but we seemed to overlook that step:). So, we put the whole thing outside to get it cooled down to 65 degrees so we could add the yeast. In the meantime, we'd had a few beers, had friends over for dinner and movies, had a few more beers... and were totally ready for bed. The fermenter had only cooled to 80 degrees but our homebrewed experienced friend assured us that we could just deal with it in the morning and nothing bad would happen...
True to form, Ty woke up at 3am, hungry, and added the yeast, sealed the fermenter and inserted the airlock... or so he thought, anyway. Remember, before, where I complained that nothing was labeled?? Well, the directions call for the airlock to be inserted and then add water to the fill line. In our equipment, there was only one thing that could be filled with water but it had no fill line. It was weird but we were able to get it into the grommet in the fermenter lid so we thought, this must be the airlock!
We had so much fun brewing that first batch and we decided that we wanted to start our second batch this weekend. Which meant that we needed the ingredients as well as a few duplicate pieces of equipment... which meant a trip back to our local homebrew store. And, lo and behold, what we were trying to use as an airlock was actually the bottle filler and our kit was completely missing an airlock!!! I'm sure you veteran brewers out there will have a great chuckle at that... but it is super confusing to an newbie!!
The lady there said to just go ahead and transfer to our secondary and add the airlock to that and we'd be just fine. Of course, Ty did this without reading the directions so he just poured it in rather than syphoning it. Hopefully, though, it'll be okay.
At this point, I'll just be happy if we get something that's tolerable to drink. As I'm typing out this blog post, I'm waiting for the water on our second batch to heat to 165 degrees. So, we seem to be hooked on this new hobby of ours. I'll leave you with two pictures - our kit and the malt, improvised grain bag and my brewing beer for batch #2.


We decided to start with a stout because the ladies at the homebrew store said it was a good starting beer and because we really enjoy stouts. We bought a starter kit but, upon opening the box, were a bit disappointed that there was nothing to explain what each piece of equipment was nor were most of the items labeled. After getting the water up to the proper heat to put the grains in, we realized that we'd neglected to buy a grain bag. That was fine, though, thanks to my cheesemaking adventures. We improvised a 'grain bag' out of a 2 foot by 2 foot section of cheesecloth. First crisis, adverted!!
So, we steeped the grain for half an hour, added the malt and boiled for an hour. At the end of that, you're supposed to add a bag of ice to the fermenter before adding the hot liquid... but we seemed to overlook that step:). So, we put the whole thing outside to get it cooled down to 65 degrees so we could add the yeast. In the meantime, we'd had a few beers, had friends over for dinner and movies, had a few more beers... and were totally ready for bed. The fermenter had only cooled to 80 degrees but our homebrewed experienced friend assured us that we could just deal with it in the morning and nothing bad would happen...
True to form, Ty woke up at 3am, hungry, and added the yeast, sealed the fermenter and inserted the airlock... or so he thought, anyway. Remember, before, where I complained that nothing was labeled?? Well, the directions call for the airlock to be inserted and then add water to the fill line. In our equipment, there was only one thing that could be filled with water but it had no fill line. It was weird but we were able to get it into the grommet in the fermenter lid so we thought, this must be the airlock!
We had so much fun brewing that first batch and we decided that we wanted to start our second batch this weekend. Which meant that we needed the ingredients as well as a few duplicate pieces of equipment... which meant a trip back to our local homebrew store. And, lo and behold, what we were trying to use as an airlock was actually the bottle filler and our kit was completely missing an airlock!!! I'm sure you veteran brewers out there will have a great chuckle at that... but it is super confusing to an newbie!!
The lady there said to just go ahead and transfer to our secondary and add the airlock to that and we'd be just fine. Of course, Ty did this without reading the directions so he just poured it in rather than syphoning it. Hopefully, though, it'll be okay.
At this point, I'll just be happy if we get something that's tolerable to drink. As I'm typing out this blog post, I'm waiting for the water on our second batch to heat to 165 degrees. So, we seem to be hooked on this new hobby of ours. I'll leave you with two pictures - our kit and the malt, improvised grain bag and my brewing beer for batch #2.


Thursday, May 26, 2011
Dairy Day
In what should be a surprise to no one, our mozzarella day has turned into a mozzarella, ricotta, butter and Greek yogurt day! We are nothing if not overly ambitious. And, Jewel doesn't know it yet, but I'm hoping that we'll also be make a couple of baguettes with the leftover whey from the cheese making. I've also never made bread but our cheese making instructor said that using whey instead of water makes for very good and interesting bread. Seems only natural that we should be serving up our homemade cheese with some homemade bread, no?
Wednesday, May 25, 2011
Cheese Making Class
Jewel and I took a cheese making class last night and it was amazing! The process is amazingly simple yet very precise. The instructor, Debbie, had a very relaxed and down to earth personality. She made the class both fun and informative. In fact, I'm trying to rearrange my schedule to go to her feta class soon!
We are so inspired to make some of our own mozzerella that we will be making some this weekend. I'll be sure to take lots of pictures and post about it here so stay tuned...
We are so inspired to make some of our own mozzerella that we will be making some this weekend. I'll be sure to take lots of pictures and post about it here so stay tuned...
Monday, May 23, 2011
Meatless Mondays and no TV Tuesdays
Meatless Mondays and no TV Tuesdays are two ideas that I'm toying with incorporating into my life. I don't think it would do any harm to go one a week without any meat. And I also don't think it would do any harm to go one night a week without watching TV - although I think convincing my better half of this might be a lot of work... if not totally impossible. I have a stack of about three months of magazines and several books that I really should get to. Eliminating one evening of TV in lieu of reading sounds like a really good idea.
Anyone out there try either of these ideas? If so, what about it worked for you? And what were the challenges?
Anyone out there try either of these ideas? If so, what about it worked for you? And what were the challenges?
Sunday, May 22, 2011
CSA
Our CSA summer share started this week after a month off since the winter share. I missed it! This week, we got collards, leeks, green garlic, spinach, parsley, cauliflower and popcorn kernels. We like to supplement our share with our two raised beds which I like to call my kitchen garden. We put two types of lettuce (just don't ask me which types!) a couple of weeks ago. We have rosemary, chives and thyme that regularly overwinters quite well so I've been regularly harvesting lettuce, chives and thyme for salads for Ty (I don't eat salad). We've also been often using the chives, rosemary and thyme in regular meals for the last month or so.
I planted the majority of the rest of the garden yesterday. We put in SIX basil plants for four varieties! I think that basil has been my best gardening success - we use it some in cooking but mostly use it to make batches and batches of pesto. We don't always do it the same way but it's generally always a combo of basil leaves, pine nuts or walnuts, parm and EVOO. We them but the pesto into ice cube trays in the freezer until set. Then we pop the cubes out and into a freezer bag to use the rest of the year. Except that we always, always run out well before the next year's basil season. So, this year, we doubled up on the basil plants:).
We've also put in four tomato plants, another chive, another rosemary (this one trailing), green beans and soybeans. The soybeans are an experiment but we did get them last summer from the farm so I'm pretty sure it is at least possible to grow them here.
I'd also like to add three tomatillo plants. Last year, I had the most beautiful tomatillo plant you've ever seen - tall, healthy with tons and tons of flowers. I was so proud. And I waited and waiting for that puppy to fruit... before I looked it up and discovered that one plant will never fruit because a solo plant does not pollinate. SO, this year I need enough that they will pollinate so I can make a bunch of salsa verde!
I planted the majority of the rest of the garden yesterday. We put in SIX basil plants for four varieties! I think that basil has been my best gardening success - we use it some in cooking but mostly use it to make batches and batches of pesto. We don't always do it the same way but it's generally always a combo of basil leaves, pine nuts or walnuts, parm and EVOO. We them but the pesto into ice cube trays in the freezer until set. Then we pop the cubes out and into a freezer bag to use the rest of the year. Except that we always, always run out well before the next year's basil season. So, this year, we doubled up on the basil plants:).
We've also put in four tomato plants, another chive, another rosemary (this one trailing), green beans and soybeans. The soybeans are an experiment but we did get them last summer from the farm so I'm pretty sure it is at least possible to grow them here.
I'd also like to add three tomatillo plants. Last year, I had the most beautiful tomatillo plant you've ever seen - tall, healthy with tons and tons of flowers. I was so proud. And I waited and waiting for that puppy to fruit... before I looked it up and discovered that one plant will never fruit because a solo plant does not pollinate. SO, this year I need enough that they will pollinate so I can make a bunch of salsa verde!
Subscribe to:
Posts (Atom)